Showing posts with label motor. Show all posts

Saturday, August 15, 2009

ULTIMATE PROJECT CRAWLER COMPLETED!!! SUCCESS!!

After hours of hard work finally the conversion from stock mini monster truck to profesinal grade super crawler have finally reach its goal. Super flex torsion axle, longer stable stance and 100% terrain crawler with high power climbing rate equal to AXIAL AX10 crawling capability. With Tamiya CR01 driveshaft, MAMBA 25 ESC, 2.4Ghz and dual steering front and rear... no terrains or obstacles can stop this might beast. Would like to thanks our Member Crawler community from rctech for supply me crawler parts. This is rock crawler at its best! will post you the video too hehehehehehe...

First i would like to thanks to member of rctech (http://www.rctech.net) "Ecrawler" for reserving me his stock Huanqi mini monster (A-Tech Leo-x) for my conversion work to full pro spec crawler. Took me around 11 hours of work to convert an innocent shorty mini monster to extreme crawler spec.

Construction Material:
-------------------------------
-Huanqi mini monster stock models (1/20 scale - 'aka' A-Tech Leo-x model)
-2.4Ghz Sanwa receiver
-Castle Creation: MAMBA 25 Brushless ESC
-4x steel clip rods + 6x mini radio antenna (For lower axle push rod and mid drive shaft rods)
-4x extended slim push rods for front and rear steering and center axle positioning
-Lipo 2s 800mah 15c batt
-4x Plastic rod wall concrete insert ( for adapter to attached Tamiya CR01 adjustable drive shaft to axle and gear box)
-TAMIYA CR01 adjustable drive shaft


Useless stuff to be thrown off from chassis:
-------------------------------------------------------------
-Stock Rx and TX
-Stock 50A Brushed ESC
-Nimh 7.2v batt
-4x stock push rod axle
-2x short mid drive shaft

Work hours - 11hrs

-------------------------------------------------------------------------------------Performance:
What can i say it climbs like a spider!!!...that is when i use brushless 4200KV motor + 8T HPI RS4 micro pinion gear).


Photo:

Wednesday, September 10, 2008

Yes its another overtime late night project...zzzz..zzz


Well its another sleepless nights for me, a broken computer, raining day outside can't ride my mountain bike, boring tv program, bored on PSP games...so i decided to spents some time recycling some of my expensive junks and make it usefull. So like lastime i decided to builts another performance R/C mini monster full proportional radio control models using 1/18 R/C parts. Below are process of stuff that i did.


Ingredients:
--------------------
RM$550 -Castle Creation: SIDE WINDER MICRO Brushless ESC + Brushless motor
RM$100 -HL Receiver (RX) 3 channel port
RM$69 -New empty mini monster chassis/case with locked diff
RM$55 -KYOSHO AM radio crystal (RX)/(TX)
RM$55 -TOWER PRO micro servo
RM$18 -Battery connector set with high amp wire
RM$27 -Fresh new NRX-18 Aluminium pinion gear with allen lock.
RM$14 -HL Crystal socket
RM$75 -8 pcs PN-RACING sealed ball bearings for wheels and drive shaft

Estimated cost: RM$963


Working tools
---------
-FINISHLINE 'Teflon' coated lubricant
-Narrow nose pliers
-Philips screw driver
-Wire solder tools
-Sets of Zip tie
-Tamiya craft pen knife


Construction process timetable
----------------------------------------------------------------------------------------
8.00pm - Prepare all the stuff. Dismantle the cheap chassis.

8.10pm - Modify and cut the rear gear case to allow brushless motor and big Alumimium pinion gear to fit in. Use 4x zip tie to lock the brushless motor intact. Insert 4x PN-Racing bearings inside the gear transmission and both wheel arms drive shaft.

9.00pm - Modify and poke a hole beside the steering case. Insert PRO TOWER micro servo and screw in and zip tie it on two side of the steering servo.

10.30pm - Main chassis battery case will be wired with high amp thick wire, then solder. Battery connector to be soldered to the + and - tabs. Solder the on/Off witch via ESC wires.

10.40pm - Plug in ESC and Steering servo plug into CH1 and CH2 slot inside HL micro receiver box. custom remote crystal wire slot into two whole of crystal sockets. Then insert the HL Receiver(RX) inside the chasis case vertically, press fit. All required wires to be pull out to external. Then seal and cover the chassis housing cover to seal the HL receiver box.

11.30pm - Setup the antenna protected with long plastic pipe againts statics charges.

11.40pm - Rearrange all the bulk wires and zip tie it on to the chassis. SIDEWINDER ESC connected to the motor gold bullet plugs. This time the red and black color are connected in reverse direction because the chassis gear have two spur for torque power transfer. Connect Kyosho AM Cystal module to the remote crystal socket.

12.00am - Install back all the chassis parts, suspension, screw, wheels, tyres, springs, tower clip, switches, suspension pivot/bridges and etc. Lube all the parts with permanent water proof Teflon coated lube.

12.45am - Insert battery, Testing and tuning, Re-programming SIDEWINDER ESC programming setting.

1.00am - Test Drive.

1.30am - SUCCESS!!!!!

Tested behind the office this morning and it sprint way faster then MINI-Z and NANDA-NRX. Its spins uncontrollably as you experience brushless on NRX-18. Powered only 4.8V AA 2700mah battery is just enough to kill this mini truck. At last no more ESC over heat!! No more smoke come out from electronic yeehaaaaa!!!! I love it. Now i have two sets of mini monster!! cool!

Monday, February 25, 2008

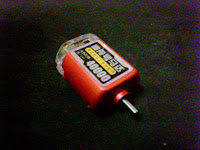
40000 rpm motors for my mini-z rc


Well today i didn't work much on my 3d models or any design. Mostly today i spent much of my time at town with my buddy looking for mini-z radio control upgrades. Planned just for windows shopping survey for parts before planing my initial budget next week but there were limited pack of motor for upgrade at "Toys World". At first i was aiming for TAMIYA PLASMA motor which rev around 2900 rpm or decent TAMIYA TORQUE TUNED motor which is the best so far but another motor above the shelf hit 40000 rpm!!! left two packs so i grab the last two boxes, paid in cash and heads home happily! why? because those motors are rare to find especially around this city as we've search up and downs every corner of the shop looking for ultimate parts for r/c upgrades.

At home upon inspection it was highly tuned motors using carbon brushing and fully bearings shaft! Online manual for mini-z upgrade won't allowed these hi-rev motor as it could fried my ESC (Electronic Speed Controller) without FETs chip upgrades unless i installed external Turbo device. The only option i should put this motor on is to installed on cheap R/C such as my Auldey monster or that Race-Tin Gen 3 can. I'm not going to put my hundreds dollars of I-WAVER R/C cooked. Hope fully next week mod we could see this motor hit around 80-89KM/H. And fried PCB board. I hope i can post it in youtube.com soon.

Wednesday, February 13, 2008

Mini Radio Control 4x4!

After 3 months!...Found it! Thanks to my buddy who manage to inform me about the last available stocks of mini 4x4 at Toys World i manage to rush to the shop after office hours and bought this cool Hummer like 4x4 mini R/C truck at only USD $13 dollars. With 2 servo action and cool suspension setup....cheap eh? Check out this clip with similar models attached on this video. For you info this mini radio control came from Hong Kong under AULDEY brand http://www.auldey.com . Actually this toys were out sold for almost 3 months but return back with less than four stocks only at our local toy shop. So me any buddy quickly grab it quick last evening. He got pimped up HILUX replica. The stocks comes with crappy controller and sticker but i stripped it off leaving it beautifully plain. Next month i'm gonna place a few cash for upgrades and performance upgrades just enough to blast some dirt on the track and do some rock crawling. With my hands holding this cool piece of hardware i forgot about 3d models work for today. Time to take a break and enjoy..